About Me

Putrajaya, Malaysia
8th Ed. Warhammer Fantasy Battle is damn fun. Try it!!

Monday, December 23, 2013

The Carnival of Flesh : Raven Guard vs Dark Eldar 1850 pts Battle Report

Right after my lost to the Thousand Sons, I had a game versus a funky Dark Eldar Coven list as follows:

Ancient Haemonculus
Haemonculus
7 Grotesques
3 Splinterborn in Venom
10 Warriors in Raider
2x5 Wracks in Raider
3 Wracks in Venom
10 Scourges
2 Talos
Razorwing Jetfighter

Mission : Purge The Alien, but that wouldn't be fun for the DE so we rolled again --> Big Guns Never Tire (5), Night Fight in play.
Deployment : Dawn of WarRG chose to go second.

As can be seen in the picture below, the Coven deployed 2 Talos on the left flank and everything else to the right. Only the Razorwing was in Reserves.

I deployed the Centurions to counter the Talos. Chapter Master and the Assault Marines were deployed in the centre, hidden from the Scourges by the large Bastion. One Snipers infiltrated to the left and one more right behind the large Bastion. Finally, Shrike and the Vanguard Veterans infiltrated behind the small Bastion.

At the dawn of war
My attempt at Seize The Initiative failed and the Coven went first. The Talos split, one moved towards the objective and the other backed away towards the square build. Scourges jumped down from the tower and then the shooting began. 60+ poisoned shots and 3 Dark Lance killed 4 Assault Marine, took one wound off my Chapter Master, and killed 1 Centurion. Guess what? Both the Centurions and Chapter Master's unit failed Morale Check and fled towards the table edge. Lucky the Chapter Master and Assault Marines rolled low on the 3D6, stopping just about 2 inches from the table edge ( Phew! ). The Centurions fled 3 inches.

Came my First Turn, 10 man Tactical in 2 Combat Squads make a drop right beside the tower. 1st  Combat Squad destroyed a Raider (First Blood!)with 10 man DE Warriors, killing 6 Warriors in the explosion, forcing the survivors to flee 10 inches. 2nd Combat Squad Rapid Fired towards the Scourges, killed 2-3 of them.

The Centurions rallied and killed the Talos on the left. Prior to that, Shrike and the VVets already made their move towards the Talos, so now they were stranded in the open. The Chapter Master and his retinues jumped towards the small Bastion, safe from any enemy LOS. The Snipers at the centre embarked the Bastion, onto the Battlement and sat still.

Ooh.. here comes the pain
2nd Turn. Razorwing jetfighter entered the game and targeted the VVets with 2 Monoscythe Missiles, a Splinter Cannon and a Dark Lance. Lucky my saves were quite good where only 3 Veterans (all with Storm Shield) fell as casualties. Several poisoned weapons also targeted them but in the end, Shrike survived with 5 VVets. The rest of the army focussed their attention at the 2 Tactical Combat Squads behind their line, which they successfully destroyed with shooting and assault.

Came my turn, the Storm Raven arrived just in time to stop the Razorwing. Shrike led his unit to the square structure, closer to the Talos. Centurions shot at the Talos, causing 2 wounds. Deathwind Launcher targeted the Scourges, easily hitting 6 Scourges and a Venom (Splinterborn inside) if I rolled a Hit!, but alas, it scattered far towards the Grotesques, causing some wounds (Don't remember how many).

Then the Chapter Master ordered an Orbital Bombardment to strike at the same target, this time a Hit!. The Venom instantly destroyed, the Splinterborns pinned. 4 Scourges died, leaving only 3 left to fight. Additionally, the explosion also killed 2 more Warriors nearby, forcing them to flee off table.
Things were getting even
On the 3rd Turn, my opponent decided that it was a good time to start making a move towards the other objectives. 2 Raiders with 5 Wracks each split from the main force. One moved to the south of the large Bastion, the other one to the centre. Some poison shots reached the Centurions, causing one unsaved wound.

My opponent deemed that the Drop Pod with its deadly Deathwind Launcher a serious threat to his fragile troops. So he pulled back the Grotesques and wrecked it in assault. In the same phase, the Talos assaulted Shrike and the VVets, but Shrike slay it with the Ravens Talons.

When it was my turn, I pushed Shrike's and his unit towards a Venom (3 Wracks inside), they destroyed it in assault and the explosion pinned the passengers. Towards the centre, the Chapter Master led the Assault Marines to destroy a Raider, also in assault.

As for the last Raider to the South, I chased it with the Storm Raven but the gunship only managed to a weapon destroyed result. However, the Raider was within range of one Gravcannon, which wrecked it with an Immobilised result due to moving Flat Out in the previous turn. 5 Wracks inside passed the pinning test and moved towards the Bastion. Fully expecting that, the Snipers on the battlement had earlier moved into the Bastion to prevent the Wracks from entering it in the next turn. The Scouts on the left flank moved closer to an objective.
We're getting there 
Turn 4. The Grotesques moved towards the centre, they're going after the Chapter Master and his unit, but still too far for a charge. Scourges and Splinterborne shot at Shrikes unit, killing two Vets. The Wracks at the centre killed 2 Assault Marines with Liquifier Gun. The Wracks down south moved into base contact with the Bastion and shot Liquifier Gun through the Fire Points, killing 2 Scouts.
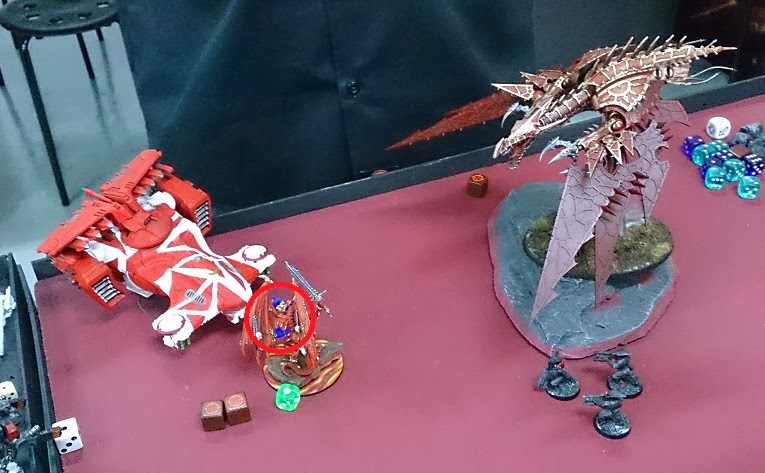
The Chapter Master showed the boys how real men fight.. ALONE!
This turn, I focussed on killing all the DE troops to secure my win. Strom Raven destroyed the Wracks hugging the Bastion. Shrike and his team killed the 3 Wracks up on the rocky terrain, and the Assault Marines killed the Wracks at the centre. The game was mine.

With the mission secured, I sent the Chapter Master (Alone!) to fight the Ancient Haemonculus and the Grotesques. However, the Ancient Haemonculus was not without his own tricks. He pulled out a glassy item and threw it to the Chapter Master... a Shattershard! The thing exploded upon impact and forced 2 Toughness Test on my Chapter Master, of which he failed one and was removed from the game with no saves of any kind allowed. Nasty stuff. Good for Wall of Death.

Our mission secured, let us go home boys
5th Turn. Splinterborn and Scourges killed all the VVets and reduced Shrike to a single wound. The Grotesques went after the Assault Marines, killed 2 with Liquifier Gun, but failed to reach assault.

Came my final turn, Shrike and the 2 remaining Assault Marines destroyed the Scourges while the Storm Raven took out the Splinterborn. The Scouts in the Bastion moved out and captured the objective nearby and the game ended.

RESULT:
Coven : Slay The Warlord
Raven Guard : First Blood + Linebreaker + 3 Heavy Supports + 2 Objectives = Raven Guard Won!!

Post-game Assessment:
The game was really fun. Both our list was quite even, fun and fluffy. This kind of game is the one that I enjoyed the most. His list had the advantage of range and uber CC unit. While mine has fast infantry and better survivability. We had equal chance to win at the start of the game.

The Tactical Combat Squads and Drop Pod with Deathwind Launcher is the catalyst for my win. Bt deploying them behind the enemy, I managed to divert his attention (especially the Grotesques) away from me. That gives me ample time to do what was needed to win me the game.

What also mades the different was his rolls for the poisoned weapons which was quite low. On the other hand, my rolls were superbly good on several occasions. My rolls were so good that I almost lost the Chapter Master and Assault Marines early on due to failed morale check. Even the Chapter Master rolled high on the Shattershard (hahaha).

Vanguards didn't do much in the game, what they did was protect Shrike, which can be done cheaper with regular Assault Marines. The Centurions on the other hand, did great taking out the Talos. Those are the only target worth their attention anyway since everything else was with 5+/6+ armoursaves which can just laugh out at their Gravcannons.

It was a very fun game. One I truly enjoyed.

That's all for today and thanks for reading.

MERRY CRISTMAS TO ALL!

Have a nice day :)

Sunday, December 22, 2013

Against The Dark Master : 1850 pts Battle Report

Last week I had Be'lakor leading my Daemons of Khorne. But last Saturday was the opposite, the Dark Master fought side by side with Ahriman and the Thousand Sons, against my Raven Guard.

This was my list for the day:
Chapter Master - THammer, Shield Eternal, Artificer Armour, Auspex, Jumpack
Shrike
10 Vanguard Veterans - 5 with Storm Shields, 3 with Power Swords + Melta Bombs, 2 PFist
10 Tacticals - Meltagun, Combi Melta
Drop Pod with Deathwind Launcher
2x5 Snipers
10 Assault Marines - Vet. Sargeant with PAxe+Meltabombs
3 Centurion Devastators - Gravcannons + Amps
Storm Raven - TwinLasscannon, TwinMMelta, Hurricane Bolters

The idea for the list was to try out the Vanguard Veterans as they are very synonym with Raven Guard. I know they are points-better-spent-elsewhere especially in our highly competitive meta here, but I've always enjoyed playing games with fluffy list more than anything and wanted to see how they would perform on table.

My opponent was the Thousand Sons player I fought during the Force Recon Tournament. This was the second time my Raven Guard fought his army. The first encounter was a lost to my Raven Guard and now his Thousand Sons were made even stronger with Be'lakor within their rank.

Primary : Thousand Sons
Ahriman
Be'lakor
2x13 Thousand Sons
Baledrake

Ally : Black Legion
Prince with The Last Memory of Yuranthos
6 Chosens with 6 Plasmaguns in Rhino

The Game : Big Guns Never Tire (4), Night Fighting
Deployment : Vanguard Strike Deployment. Raven Guard deployed first.

I deployed the Chapter Master normally with Shrike and the Vanguard Veterans as close as possible towards the enemy deployment zone, inside the forest. 3 Centurion Devastators also deployed in the forest and the 2nd Assault Marines just behind them. Both scouts were put in reserves.

My opponent deployed as can be seen in the picture below. With Master of Deception from Ahriman, he Infiltrated both of the Thousand Sons units and the Chosens. But something I just realize when writing this Battle Report was that he might have Infiltrated both Be'lakor and the Black Legion Daemon Prince, perhaps by mistake. That was a HUGE mistake. Silly me for not realising that.

His attempt to seize the initiative failed.

The flock of ravens moved towards Ahriman
I began with Tactical Squad performed a Drop Pod Assault right in the middle of the enemy line, and break into Combat Squads. 1st Tactical Combat Squad with Meltaguns failed to destroy the Rhino (Chosens inside), causing only Crew Stunned result.

Centurion Devastators moved forward, shot at the Black Legion Prince, causing 10 AP2 and 3 AP5 wounds but he saved it all except 3. The 2nd Tactical Combat Squad tried to bring down the last wound with Bolters, but couldn't break through his Power Armour.

Shrike led the Vanguard Veterans and the Chapter Master towards Ahriman and his Thousand Sons on the left flank. The assault was a success, the Ravens lost 3 man while the Chapter Master lost one wound in a challenge, but they killed 12 Thousand Sons. With only Ahriman and a Rubric Marine left, I thought they might end it all in the next turn.

But I was wrong.

Came the enemy turn, The Vanguard Veterans were targeted with Hallucination spell twice, once each by Ahriman and Be'lakor. Even with Adamantium Will granted by the Shield Eternal, I failed to deny the spells and the whole unit was left standing still, doing nothing, for the whole game turn.

The Black Legion Prince Swooped forward and cast the Sunburst spell with 2 Warp Charges. The spell hits the Vanguard Veterans, Assault Marines (2 casualties) and the Centurion Devastators (1 wound). The spell also Blinded all three units (I failed all 3 Initiative Test hahaha).

The Thousand Sons unit at the centre moved back and killed the 1st Tactical Combat Squad (1st Blood). The Chosen on the other hand, disembarked from the Rhino and Snap Fired at the 2nd Tactical Squad, killing one guy but lost the Chosen Champion from Gets Hot!

Be'lakor glided forward and assaulted the Assault Marines. I sent my Veteran Sargeant to fight him and hold him for a round of combat. Ahriman fought my Chapter Master in a challenge but failed to cause any wound. The lone Rubrics started to slowly kill my Vanguard Veterans.

The reinforcements came
My 2nd Turn, all the reserves came in. I was hoping that the Scouts would came later, after the Storm Raven deal with the Baledrake that would come in the next enemy turn. I can only pray the Baledrake didn't make it in the next turn.

Now with the Centurions Blinded, I used them to take out the Black Legion Prince. The Prince had no chance against 15 Gravcannon shots, even if Snap Firing. The Storm Raven shot at the Chosens and killed 2 guys. Deathwind Launcher also targeted the Chosens, but scattered too far away. The 2nd Tactical Combat Squad on the other hand, failed to harm the Chosen with their Bolters.

Close combat saw Be'lakor killing 4 of my Assault Marines, leaving 3 guys left to fight him. Meanwhile, Ahriman took one wound off my Chapter Master.

On the enemy turn, the Baledrake came in, took 1 Hull Point off the Storm Raven with Vector Strike and incinerated a Scout unit with the Baleflamer. Ahriman and Be'Lakor again casted Hallucinate on the Vanguard Unit. They would stay in that sorry state for another game turn (Duh..). The Chosen squad wipedout my Tactical squad.

I was expecting Be'lakor to easily kill the rest of the Assault Marines (left with only 3 man) in this close combat phase. That would left him stranded in the open, easy prey for my Storm Raven and Centurions. But somehow Be'lakor failed miserably in his attacks, managed only 3 hits (after reroll) and from that, only 2 wounds. With one Assault Marines stuck with him in combat, Be'lakor would be free to do whatever he wanted in the next enemy turn.

Funny thing, Ahriman failed to wound to the statue of my Chapter Master.

3rd Turn. With nothing to do, I sent the Storm Raven and Deathwind Launcher towards the Thousand Sons. They killed some, maybe about 4-5 guys (Don't really remember). The Centurions shot at the Heldrake but failed to cause any damage. Then it was close combat where Ahriman still failed to harm my Chapter Master. Be'lakor killed the last Assault Marines and moved closer to my Centurion Devastators.

Things are getting worst for the Raven
On enemy turn, Be'lakor glided towards the Centurions, killed some with Psychic Shriek and the rest with assault. This time, Ahriman managed to kill my Chapter Master. Shrike killed the lone Rubrics but they stayed in combat. The Baledrake moved towards my 2nd Scout Squad, flamed and killed 3 guys.

This is the end
4th Turn. I sent the Storm Raven to hunt down the Baledrake. The attack damaged the Baleflamer, but failed to destroy it completely. In close combat Ahriman (boosted with Warp Speed) killed Shrike in challenge.

With almost nothing left to help me clear the enemy troops, I conceded the game.

Result : Thousand Sons Won!

Post-game Assessment:
Be'lakor again showed just how he worth every points you spent on him. It is thanks to his Hallucination that my opponent successfully locked my Vanguard Veterans, Shrike and Chapter Master from doing their job.

The Vanguard Veterans were nasty in their charge, killing 12 Rubrics in a single charge is no easy feat. I doubt any normal Assault Marines would be able to do it. But that is all I can say about them. Thanks to Hallucination, the Veterans didn't do anything after the 1st Turn, and were slowly killed by the lone Rubric Marines accompanying Ahriman. In the end, there's only two of them left facing Ahriman. I need more game with them.

The Centurion Devastators are truly dangerous. It was thanks to them that I can easily deal with the Black Legion Prince. I'm liking them already :)

Next:
With that concede, I had enough time for another game. This time was against the Carnival of Flesh.
The battle report for it will follow soon enough. So stay tuned :)

Until then, have a nice day.

Saturday, December 14, 2013

Trying Out Be'lakor : Daemons vs Tau 1850 points Battle Report

My Warhammer Fantasy Battles session with Almond were cancelled. So I took this chance to try out the new Be'lakor. My list for the night:

Primary : Daemons
Be'lakor
Bloodthirster
2x10 Bloodletters
15 Flesh Hounds
Khorne Prince

Ally : CSM
Khorne Prince
5 Chaos Space Marines
Baledrake

My opponent was one of the better Tau player around. During the Ascension Tournament few weeks back, he did good with 2 wins and 1 lost record (same as me) whereby the lost was to the Tournament Champion. I always wondered how would my Flying Circus fare against his Tau. Let us find out.
 
Primary : Tau
Ethereal
Fireblade
2x Riptide
3x12 Fire Warriors
2x6 Pathfinders
2x Skyray
3 Broadsides

Ally : Farsight Enclave
Fireblade
2x3 Crisis - 4 Fusions, 2 Plasmas

I thought he was gonna bring 3 Riptides and a R'Varna. Not today it seems.

Mission : Emperor's Will, Hammer and Anvil deployment, Night Fight, Daemons deploy first.
 
I deployed 3 LOS blocking terrain that would help me advance. Tau on the other hand, deployed minimal terrain so he can have better killing ground. 
Deployment and Scouts move
Tau failed to seize the initiative.The First Turn began with the Bloodthirster opening the Portalglyph near my objective. Then I grimoired the Flesh Hounds and pushed all my Daemons forward, plus the 2D6 flat out move. Be'lakor attempted Puppet Master on the nearest Skyray. The idea was to use it to take out the second Skyray. But it was cancelled with a successful Deny the Witch.
 
The Tau alliance reacted
My opponent tried to kill Be'lakor early on with the Skyray and Riptide. But to my luck, his rolls was pretty bad with so many misses and even triple ones when rolling to wound with the S8 Missiles. Be'lakor lost only 2 wounds but was grounded.
 
The rest of his army aimed at the Flesh Hounds and that was when I realize just how strong this army is. 36 Firewarrior led by Etherial and 2 Fireblades dished out 132 S5 shots at short range, all hitting on 2+ thanks to the Markerlights. My Flesh Hounds got no chance at all hahaha..
 
The Daemons going for the kill
On my Second Turn, I grimoired Be'lakor, providing him with the much needed 2++ save. He sent a unit of Firewarriors and their Fireblade fleeing off table with Terrify. Then with Puppet Master, he took control of the rear Skyray and shoot at the Etherial unit, killing 6 guys. The 3rd spell, Psychic Shriek, didn't cause any wound to the target. A Bloodletter unit deepstriked nearby but was annihilated by the two Riptide Interceptors.
 
Bloodthirster and both Daemon Princes glided towards their target and assaulted. The amount of Overwatch fire they had to go through was scary, but they made the assault and destroyed a Skyray and a Firewarrior unit.
 
(Note: I just learned in this game that a Riptide that performed Intercept can still do supporting  Overwatch)

That didn't look good for the Daemons
2 Crisis Team, each with 4 Fusion Guns, and  Plasma Rifles deepstriked behind the Etherial without scattering thanks to a Homing-Beacon-like item. They easily killed the Bloodthirster. The Broadside team then killed my CSM Prince with Missiles + SMSs. The rest of the army tried to bring Be'lakor down but he survived with his 2++. 
 
Third Turn. The last Prince grimoired Be'lakor and then I sent him towards the Broadside Team. Terrify failed to send the Crisis Team running while Psychic Shriek failed with a roll of 11 on Psychic TestPuppet Master on the nearest Riptide worked, killing 1 Crisis, 1 Broadside and 2 Firewarriors in the Etherial unit. Another 10 Bloodletter unit deepstriked nearby but was reduced to 4 guys by the intercepting Riptides. The Baledrake also came and incinerated a unit of Pathfinders with Baleflamers.
 
Close combat saw Be'lakor killing the Etherial and his unit while the Prince destroyed the Broadsides.
Two.. against many
The Crisis Team took out the last Prince while the Pathfinders destroyed the Bloodletters. Skyray took one wound off Be'lakor (single wound left). Both Riptides made a desperate assault towards Be'lakor, but Be'lakor managed to slay one of them with his sword and the other with Sweeping Advance.
When Turn 4 came in, there was 5 more Crisis defending the Tau objective. Baledrake moved closer, killed 3 Pathfinders with Vector Strike and two Crisis Suit with Baleflamer. Be'lakor then killed all the Crisis with Psychic Shriek and assault.

The end is near
With Tau having no more troops, it was a sure lose for them. But my opponent wasn't gonna concede. He killed Be'lakor and we moved on to Turn 5 just to find what's left at the end of the game. Baledrake finished off the Pathfinders and the game ended.

In the end, I have 5 CSMs and 14 Bloodletters (in three units, spawned by the Portalglyph), holding my objective while Tau was left with the lone Skyray.

Result:
Tau : 1st Blood + Slay The Warlord
Chaos : Slay The Warlord + Objective + Etherial. Chaos WON!

What I Think About The Game:
It was fun and scary at the same time. The Tau forces was strong. It was entirely at a different level compared to my fluffy World Eaters nor Raven Guard list. Neither can beat this Tau army without the help of uber luck on my part.

Be'lakor was the MVP of the game, sending a full Firewarrior unit + Fireblade running off the table, slain the Etherial and his unit, the two Riptides and Crisis Suits. Using him also marked the first time I ever used psychic powers in the 6th Edition. Hopefully I did nothing wrong in this game. I need to study the psychic powers well to make the better use of him.

I made a not-so-good tactical decision early in the game -- not making use of the  large LOS blocking terrain in the first turn. I was the one who put them there because initially, I planned to use them to hide my advance. This would effectively deny Tau the full use of their firepower for one turn. That way, I can also wait for the Baledrake to come and later closed in together for the kill.

But during the game, suddenly came an urge for me to do the opposite and just moved them recklessly forward. To act in character with the army. Because that is how I think a Daemons of Khorne would act, eager to spill blood, to please the Blood God as soon as possible (hahaha). I doubt even the cunning Be'lakor as general could stop the blood frenzy of Khorne Daemons. That almost cost me the game, but would also made it more meaningful if I came out on top (Which I did in the end :) )

62 skulls for the Blood God. A good harvest.

Thanks for reading. Have a nice day.


Thursday, November 28, 2013

Dropzone Commander : Unboxing The 2 Player Starter Set

Greetings all,
 
Today I'm gonna share with you what's inside the Dropzone Commander Starter Set that I won in the lucky draw that day (Sunday, Nov 24th). Now let us find out if it is worth the RM350 price tag.
 
GAMING KIT
Complete gaming kit
The box comes with a complete gaming kit for anyone, even those new to table top gaming to start playing this game in such a short time. As you can see, it has a rulebook, model kit for 2 armies, dices, templates, objective markers, a measuring tape (small, metal cased) and dices. Everything is nicely wrapped in plastics and bubble wrapped to ensure safety of all the stuffs inside.
 
The plastic model kits provided is enough to make two armies. One of the United Colonies of Mankind (UCM) and the evil Scourge. By the time I wrote this, I've already assembled all the UCM (see picture below) and about 80% of the Scourge.
 

United Colonies of Mankind (UCM)

Each army consist of 30 infantries, 3 armoured personnel carriers, 3 battle tanks, 3 anti-air tanks and 3 drop ships. In game, they will form 3 Battlegroups as can be seen from the leaflet in picture above.
 
BATTLEGROUND
 
Tabletop wargaming isn't fun without proper battlefield, terrain and sceneries. So it is good that the box also included 2 city mat (1x2 feet each to make a 2x2 feet battlefield) and several foldable paper buildings of different sizes and heights. Which means that once I've assembles all the models, I can straightaway play the game as how it should be, right in the middle of a city. Very nice indeed!
Battleground - city mat and foldable paper buildings
THE RULEBOOK

Reading the fluff gave me the impression of War of The Worlds kind of invasion -- doom, death, and despair to the mankind, though the Scourge has the look of that alien army from the movie Avengers (Skitarii?). By the 26th century, the Earth and other human worlds will be attacked by the Scourge. Humans were forced to flee the Earth or suffer much worst fate in the hands of the invaders. After 150+ years, they come back to reclaim the lost worlds.

Besides the UCM and Scourge, there's 2 other forces player can choose from. An alien race and post-human. But I won't touch on them yet. The rulebook has complete set of rules for all units from the 4 factions. From here, all that players need to do to expand their armies is buy new models.

What disappoints me the most about the rulebook is the fact that there is zero (0) artwork in the rulebook. The only artwork is the front cover. I really would love to see how the other races looks like, their cities and all. Too bad.

CONCLUSION

I really like this Starter Set. It is a complete kit for beginners like me. It gives enough necessary things that I need to get in the game real quick. I think it is worth the RM350 one has to pay for it. For comparison, it would take much more cash for beginners to play 40k or WFB.

I haven't played the game so I can't comment much on the rules. But I'm liking what I read so far. After a game or two, I might be able to share with you all how I feel about the gameplay.
 

Okay.. I guess that's all I can say about it.

Thanks and have a nice day!

Monday, November 25, 2013

The Ascension (1.5k Tournament)

Hello guys,

On November 24th, I attended The Ascension, Warhammer 40,000 Tournament held by The Spartan Games Arena in Wangsa Maju. This tournament was set at 1,500 points and I entered with this list:

Picture credit to Marvin Michael Kho, our favourite hobby fotographer
Primary : Daemons
Bloodthirster
2 x 10 Bloodletters
2 x Flying Khorne Prince
 
Ally : Chaos Space Marines
Flying Khorne Prince
5 Chaos Space Marines
Heldrake

NEW MODELS I painted specially for the list:

i) Khorne Prince with the Axe of Blind Fury


This guy is bigger that both the old school Daemon Prince I have. It is about the size of a Bloodthirster. If GW didn't come out with new Bloodthirster model, I might get another box of this model and convert it into one.

ii) 5 Chaos Space Marines


I have painted several CSM already, but they don't really fit the look of my army. I want something that people can relate to the Bloodletters and lucky I have these in my possession ---> The OOP 13th. Co. Wulfen! It was rare to see one back here when they were in production, and even more so today. Even the Wolf Lord Syamael don't have them (so his reaction when I show them to him.. PRICELESS! :lol:) I received quite a few question about them from other people during the event.

THE ASCENSION
 
1st Game : Big Guns Never Tire (4 Objectives), Dawn of War
Opponent : Space Wolves - Thunderwolves and Drop Pods

This is funny. Before the tournament, I was the one who my opponent consult with for listbuilding so he can deal with armies like mine and he turned out to be my very first opponent.


The game was tough. Of course I could've played save and fly around but he is a good old friend and I wanted this to be fun, so I sent my Daemon Prince to combat as soon as possible. 2 Daemon Prince easily took out a Rune Priest and 9 Grey Hunters that came in with Drop Pod.


But then his big unit of Thunderwolves, lead by 2 Wolf Lords with Thunder Hammer and Storm Shields closed in and assaulted, killing both Princes instantly. I didn't really mind because one of the Prince had Warp Tether. The other one fought the Warlord with Saga of The Bear in challenge and caused one wound before it died to six S10 hammer attacks.

The Prince with Warp Tether returned to battle but died to a lucky shot from Drop Pod. The last Daemon Prince were grounded by another Drop Pod Storm Bolter. It got assaulted and killed by the enemy Warlord. My opponent consolidated 5 inches but made a wrong move in terms of model placement, both his Wolf Lords are now at the frontmost part of that pack.

My Bloodthirster closed in and assaulted from behind the pack, where both Wolf Lords were out of range to issue or receive challenges nor striked back. With smash attacks, it killed 3 Thunderwolves in the 1st round of combat, then killed the Warlord and the other Wolf Lord in challenges.

 As the Bloodthirster was about to strike the last TWC (with Power Fist), my opponent conceded.

2nd Game : Crusade, Vanguard Strike
Opponent : Farsight Conclave

This was the first game I had against pure Tau army since their release. What I knew about them from what I read over the net and the one time playing against an Eldar-Tau alliance. My head felt dizzy just from reading my opponent's list so I just let do whatever he wants and pray he didn't cheat.

He seized the Initiative (on 5+!) but only the Riptide and Pathfinders has any range to shoot. They both aim at my Bloodthirster, causing 2 wounds. Came my turn I summoned a Portalglyph and sent all FMCs towards the enemy. Shooting killed my Warlord, but he did well soaking almost 85% of the shots fired at him, and so all my Princes were saved. 


 I sent the CSM Prince to kill a Crisis Suit troops, and he performed the task successfully. Another Prince I sent to fight his big HQ unit but that unit (to my surprise), is superbly strong in combat. It has Commander Farsight, Warlord with Onager Gauntlet, 2 Bodyguards or ICs (not sure) with S8 Close Combat weapons, a Riptide (which happened to be IC) + several drones forming a HQ unit. That unit then attached to a unit of 2 Broadsides with HYML. The Daemon Prince had no chance at all (It had Warp Tether but I was so shocked with what I learned and forgotten about it hahaha!)

So I changed my plan and deepstriked all Bloodletters close to the enemy line. The new plan is to make them busy, capture the objectives and kill the enemy troops with Helldrake. It worked. I lost all of the Daemons that I sent for the attack but successfully controlled 3 objectives (with 4 units spawned by Portalglyph) to win the game.

3rd Game : Purge The Aliens, Dawn of War
Oppoinent : Daemons of DOOOOOOMM!

The 3rd and last game was against the famed Daemons of DOOOOMMM! We both play FMC list, but he has the advantage since his FMCs are Daemons Spellmasters. For me, the only way to take out his Daemons from the sky are through Vector Strike.


He began the game by killing my Prince (Grimoire Bearer). I retaliated by Vector Striking his Grimoire Bearer to death. Then he destroyed both of my Bloodletter squads by spells and close combat. Fateweaver took 2 wounds off my Warlord with spells. I went ahead and destroy his SoulGrinder.


I sent the Bloodthirster and CSM Prince to destroy a squad of Daemonettes. They killed 7 but my Warlord took two rending wounds. Daemonettes took instability check and rolled Double 1!! What a luck! The Daemonettes were back to full strength. 2nd combat round, the Daemonettes were again downed to 3 girls but they successfully killed my Warlord with 2 rending wounds. They lost and had to make Instability Check.. Double 1!?! Again!!

3rd round of combat I sent the last Prince to join since it didn't have any valid target to choose from. Together with the CSM Prince, they killed the Daemonettes down to 4, but took no wound at all. The 3rd Instability Check, this time the dice came 1 and 5. Unit destroyed! Not yet.. My opponent use the Fateweaver, reroll the 5 and it came out 1. Double 1??! Three times in a row!!

They finally destroyed the Daemonettes on the 4th round of combat, but by then it was too late already. They were now surrounded by 2 Tzeentch Spellcasters and 10 Flesh Hounds. The game ended on turn 5 and all I have left on table was the Heldrake hunting a bunch of Plaguebearers.

Daemons of DOOOOMMM! is strong indeed.

RESULT

I won 2 games and lost 1. Not enough to be at the top spot, but I'm happy enough with the result. The winners are:
  1. Alvin Alpharius Khaw (Dark Eldar + Eldar)
  2. Joe Soon (Daemons of DOOOMM!)
  3. Faizal Paxter (Tau)
I didn't win, but I didn't leave the place empty handed. My name was picked for the grand lucky draw to win a Dropzone Commander Starter Box! Awesome!!


It was one fine event, even more so because of the lucky draw hahaha. Congratulations and thanks very much to Spartan Games Arena and Vinder a.k.a The God of Deepstriking. Now I have a new game to learn :)

That's all for today.  Have a nice day guys.

Tuesday, October 29, 2013

Centurion Devastator Squad - 3/3

The Centurion Devastators Squad is done and ready for action. Here is the last guy.


It isn't going to be complete without a group photo

Sunday, October 27, 2013

New Hobby Forge and Force Recon 1k Tournament

NEW HOBBY FORGE

Last Saturday (Oct 26th) saw the grand opening of the new Hobby Forge at Zenith Corporate Park. It was a good move as the location at Cova Square was too secluded and bad for business. Here the potential is bigger and I wish all the best to Alvin.

A very nice place to hang out and roll dices
From the picture (bottom right - yellow signs), you can see a mamak restaurant where I had a nice roti telur banjir that day :). Come and visit this place and you'll want to drop by again later.

FORCE RECON 1K TOURNAMENT

I entered with a Daemons of Khorne themed list. A sucker for Close Combat, I tried making a 1,000 points CC-oriented list of all my armies but can't seems to get any that may work at that point level. Then I remembered I have some daemons ally back home and a thought occurred to me. Why not use them as a proper army on their own?

It didn't take long for me to make a list because the Daemon stuff I own are small, so I'm just going to make use of what I have. It is a very straight forward, Khornate and simple list based on the Maximum Threat Overload principal which I think is the only way CC-oriented armies may work competitively at 1,000 points.
Bloodthirster | Greater and Exalted Gifts
2x10 Bloodletters
2x Daemon Prince | Khornate, Wings, Armour, Exalted Gift
Will it work? Theoretically yes that is a scary list, but with almost no shooting at all and such a small number of models, only actual gaming may tell. So let us proceed with the game.

1st Game : Purge The Aliens, Vanguard Strike Deployment
Opponent : Dark Eldar (Coven list)

The 1st game was where beginners luck (my 1st time playing Daemons kan :)) played their role. One of my DPrince got Wind of Chaos gifts and I rolled 9, 12, 9, 9, 9 for Strength throughout the game. On the other hand, my opponent suffered several streams of bad luck, rolling low on so many important rolls. 
2nd turn - right before the slaughter began
My monsters killed everything except 5 man Wracks and a Raider to win me my 1st game.

2nd Game : Crusade, Dawn of War Deployment
Opponent : Eldar (Death by Thousand Cuts list)

Count the number of shots I have to go through. With Guide and Prescience
This Eldar list was one of the army that I don't want to face in the tourney. It has super number of shots with rerolls (I hate psychic powers!). I won the 1st turn, summoned a Portalglyph and pushed my monsters forward. Split one of the Prince to hunt down the Fire Prism and it was a huge mistake as now the Eldar war host could focus on my Warlord and Prince (They died in the 1st shooting phase).
The other Prince took out the Fire Prism and destroyed one of the Eldar troops that was holding an objective before he died.

After that the Eldar started advancing forward to try annihilate my troops holding on to an objective. At the same time, the Portalglyph kept on spawning Daemons every turn. Suddenly a Wave Serpent (5 Dire Avengers inside) skimmed nearby and I sent one Bloodletter to deal with it. Boom! It exploded and the passengers were pinned right in the middle of the table. With that the game turned into my favour since I hold 1 objective (3 VP). If I could hold it until the game end..

.. but then a Viper and 2 Warwalkers successfully moved into LOS and eliminate my remaining troops.

3rd Game : Scouring, Vanguard Strike Deployment
Opponent : Thousand Sons (Infiltrating Rubrics Marines)

This is one funny game. The opponent infiltrated Ahriman and 2x8 Thousand Sons 18 inches away from me while his DPrince (Warlord) flew from behind. Came my turn, I assaulted Ahriman unit with Bloodthirster and a Prince while the other Prince assaulted another unit nearby.

Both Prince fought unit Champions from both units and won. Bloodthirster on the other hand, killed like only 3 marines before dying to the Black Staff of Ahriman + Iron Arm (1). There goes my Warlord, and now I have a feeling that I'm going to lose the game with his Warlord flying above throwing S5 AP3 flames (Burning Brand + Gift) on my Troops. But the opponent got greedy, cast Boon of Mutation on his Warlord, and rolled 22 --> Spawnhood!! 

From then on everything went smoothly, my DPrince killed Ahriman and wiped out all the Rubrics.

4th Game : Relic, Dawn of War Deployment
Opponent : Space Wolves (Thunderwolves)

This game was mine from the very moment my opponent was announced. Not because the opponent was a bad player tactically, but the fact that his list couldn't ever beat my list without extreme luck. I knew this because my own 13th Co. Space Wolves always got bullied by Daemons back home.
There's no stopping from the carnage that is sure to come
This was basically what happened. I rolled 11 for Warp Storm table and killed his Rune Priest (First Blood) just like that. Then destroyed the Thunderwolf unit with simultaneous charge of the FMCs. Bloodthirster slain the Thunderwolf Lord in challenge, then proceed to hunt down the dreads and troops. Opponent conceded.

Result : 3 Wins and 1 Lost

I'm pretty happy with the result, it was a fun experience. I never thought 1k point games can be so fun like this. Anyway, the tournament was won by once again, our Chosen Joe Soon and his Necron army. Congratulations to Joe.

Then there was the Lucky Draw!!... Sadly, I didn't win anything. But it was fun, and I'm sure everyone felt the same from all the smiley faces I saw when I walked out the door.

Yup.. everyone had their share of fun that day
Some new faces throwing dices at the cool 4x4 tables for beginners
Again, a special thanks to Hobby Forge and Legio Malaysia for providing us a cool new place to hang out and roll some dices!

Saturday, October 19, 2013

Daemon Prince of Khorne

A few days back, I answered the Call of Chaos VI and made a pledge to paint 1 Daemon Prince and 16 Bloodletters before 15th January 2014. Seems like more than enough time to finish them.

But I will need to finish the Daemon Prince and 10 Bloodletters by the next weekend for The Force Recon 40k Tournament.

So I had to take a slight detour from completing my Centurion Devastators and focus on them daemons. I began painting the daemons on Friday and by last night the Daemon Prince was completed. Here he is..


Next.. 10 Bloodletters. I don't think I have enough time so will try my best to at least fill the 3 colours minimum for painting requirements.

That's all. Have fun!